
How to Install a Lithium Battery in Your Golf Cart: A Step-by-Step Guide for Fleet Managers and Service Professionals
Golf cart owners and fleet managers are rapidly switching from traditional lead-acid batteries to Lithium Iron Phosphate (LiFePO₄) technology. Whether you’re managing a golf course, resort, university campus, or industrial fleet, a golf cart lithium conversion offers significant advantages, including reduced maintenance, faster charging, lighter vehicle weight, and longer battery life.
Fortunately, most modern lithium batteries are designed as direct replacements for existing golf cart battery banks, making installation far simpler than many people expect. However, a successful conversion requires more than simply swapping batteries. Charger compatibility, battery management, and—on certain models—the Club Car OBC bypass are all critical to ensuring reliable operation.
This guide walks through the complete installation process, highlights important safety considerations, and explains the technical details that matter for both individual owners and commercial fleet operators.
The Quick Answer
To successfully install a lithium battery in a golf cart, first switch the cart to Tow mode and safely remove the existing lead-acid battery bank. If you’re upgrading an older Club Car equipped with an On-Board Computer (OBC), perform the required OBC bypass before installing the new battery. Next, place the lithium modules into the factory battery tray, connect the main positive and negative cables using the manufacturer’s specified torque, and replace the original charging receptacle with a lithium-compatible 110V smart charger port. Finally, power up the Battery Management System (BMS), verify system operation, and perform an initial charging cycle.
Tools and Safety Gear Required for Conversion
Before beginning your golf cart lithium upgrade, prepare the proper tools and personal protective equipment.
You’ll need:
- Insulated socket set (typically 1/2″ or 9/16″)
- Torque wrench (required for proper battery terminal tightening)
- Battery lifting strap or lifting handles
- Zip ties and heat-shrink tubing for cable management
- Safety glasses
- Insulated mechanic gloves
Because a complete lead-acid battery bank may weigh 300–400 pounds (136–181 kg), having a second person available for lifting is strongly recommended.
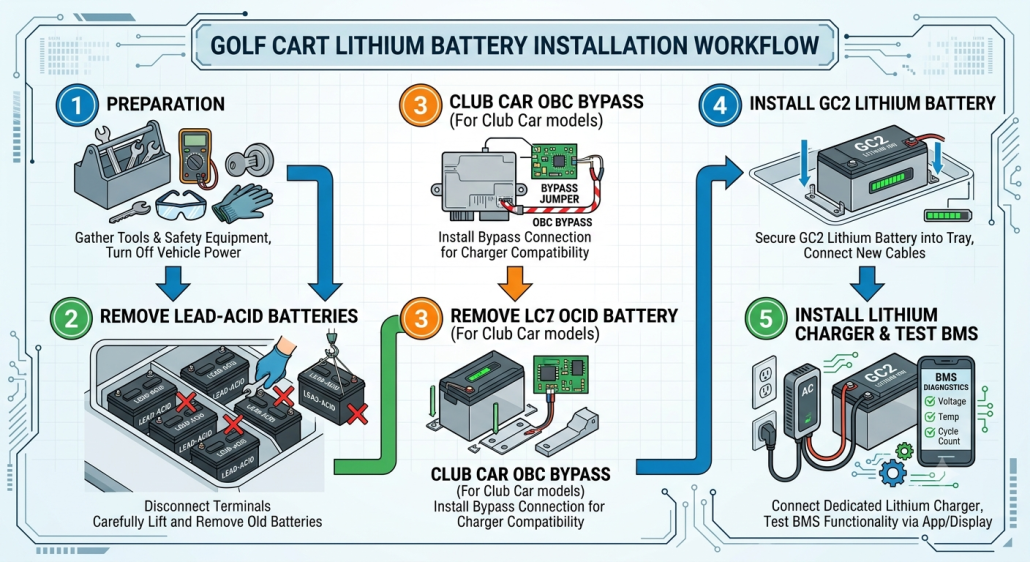
Step 1: Prepping the Cart and Removing Lead-Acid Batteries
Safety should always come first.
Before touching any electrical components:
- Turn the ignition key OFF.
- Engage the parking brake.
- Move the Run/Tow switch to the TOW position.
- Disconnect the charger if connected.
Switching the cart to Tow mode prevents accidental controller activation while working on the electrical system.
Next, disconnect the battery cables, beginning with the negative terminal, before removing the positive connections. Labeling cables or taking reference photos before disassembly can simplify reinstallation.
Once disconnected, carefully remove each lead-acid battery.
Remember that individual batteries often weigh 60–70 pounds (27–32 kg), making proper lifting techniques essential.
After the batteries are removed, thoroughly inspect the battery tray.
Look for:
- Acid corrosion
- Rust
- Loose hold-down brackets
- Damaged wiring
- Corroded terminals
Cleaning or repairing the battery tray before installing lithium batteries helps ensure a reliable long-term installation.
Step 2: The Club Car OBC Bypass (A Crucial Step)
One of the most overlooked aspects of a Club Car lithium conversion involves the On-Board Computer (OBC).
Many pre-2014 Club Car models equipped with the original PowerDrive charging system rely on the OBC to control battery charging.
When replacing lead-acid batteries with lithium, the original charging logic is no longer compatible.
If the OBC remains connected:
- The lithium battery may not charge.
- The charger may immediately shut off.
- The vehicle may enter a charging lockout condition.
- Battery communication errors may occur.
Performing the Club Car OBC bypass allows the new lithium charger to communicate directly with the battery, bypassing the outdated charging controller.
Because wiring layouts vary slightly between model years, always follow the battery manufacturer’s recommended OBC bypass procedure.
Step 3: Dropping in the Lithium Battery Bank
Modern lithium batteries are engineered to simplify installation.
GC2 Drop-In Compatibility
Most premium lithium golf cart batteries are built using the standard GC2 battery footprint, allowing them to fit directly into the existing battery tray without fabrication or structural modifications.
Depending on the battery design, your system may use:
- A single high-capacity lithium battery
- Multiple GC2-format lithium modules
Either configuration significantly reduces vehicle weight while simplifying future maintenance.
Tighten Terminals to the Correct Torque
Battery terminal connections are one area where precision matters.
Unlike lead-acid batteries, lithium battery terminals should never be overtightened.
Excessive torque can:
- Damage battery terminals
- Crack the battery housing
- Reduce electrical contact quality
- Void the manufacturer’s warranty
Always use a calibrated torque wrench and tighten terminals according to the manufacturer’s specified inch-pound (in-lb) torque values.
Proper cable routing and secure strain relief will also help prevent vibration-related wear during long-term operation.
*If your cart features 12V accessories (headlights, radios), ensure they are wired through a 48V to 12V voltage reducer rather than connected directly to the lithium battery.
Step 4: Installing the Lithium Smart Charger Receptacle
A lithium battery requires a charger designed specifically for LiFePO₄ chemistry.
In many conversions, the original charging receptacle used with the factory lead-acid charger becomes obsolete.
The installation process typically includes:
- Removing the original charging receptacle
- Installing the new lithium charging port
- Connecting the charger wiring directly to the battery system
- Verifying correct polarity
- Securing the wiring to prevent vibration damage
The new 110V lithium smart charger communicates directly with the battery’s Battery Management System (BMS), allowing charging to stop automatically once the battery reaches full capacity.
Unlike traditional lead-acid chargers, lithium chargers do not perform high-voltage equalization or desulfation cycles that can damage lithium batteries.
Step 5: Booting Up the Smart BMS and Testing
After completing the installation, it’s time to activate the battery.
Depending on the manufacturer, this may involve:
- Pressing a battery power button
- Connecting the charger to wake the BMS
- Activating the battery using a mobile application
Once powered on, verify:
- Battery voltage
- Charger operation
- Vehicle startup
- Forward and reverse operation
- Dashboard battery indicator (if applicable)
Many modern lithium batteries also support Bluetooth connectivity.
Using the manufacturer’s mobile app, users can monitor real-time battery information such as:
- State of Charge (SOC)
- Battery voltage
- Charge and discharge current
- Cell temperatures
- Remaining capacity
- Fault notifications
For commercial fleets, advanced batteries may additionally support CAN bus communication, enabling centralized fleet monitoring and predictive maintenance.
Golf Cart Battery Resource Hub
Whether you’re upgrading a single golf cart or planning a fleet-wide conversion, understanding the complete lithium ecosystem helps maximize performance and return on investment.
Explore these related resources:
- The Ultimate Guide to Lithium Batteries for Golf Carts– Learn how LiFePO₄ technology compares with lead-acid, understand voltage sag, Peukert’s Law, battery sizing, and fleet ROI. (Cornerstone Guide)
- Golf Cart Battery Life: Lifecycles, Chemistry, and How to Maximize ROI– Compare battery lifespans, charging practices, and maintenance strategies to extend service life.
- Explore the lithium battery guide for mainstream brands? Read Club Car Lithium Battery Conversion: How to Upgrade Precedent & DS Models the Right Way
Together, these guides form a comprehensive knowledge hub covering battery selection, installation, maintenance, charging, and fleet management.
Fleet Procurement Resource
Transitioning a commercial fleet from lead-acid to lithium permanently eliminates routine battery watering, significantly reduces charging times, lowers vehicle weight, and minimizes maintenance downtime. For golf courses, resorts, municipalities, universities, and industrial facilities, these improvements translate directly into lower operating costs and higher fleet availability.
Explore our Golf Cart Lithium Batteries to compare drop-in GC2 solutions, high-capacity LiFePO₄ systems, Bluetooth-enabled batteries, CAN bus communication options, and batteries engineered for demanding daily cycling.
Frequently Asked Questions
Do I need to upgrade my golf cart motor for a lithium battery?
No.
As long as the lithium battery voltage matches your existing electrical system—for example, replacing a 48V lead-acid battery bank with a 48V lithium battery—the factory motor and controller can generally remain unchanged.
Many owners notice improved acceleration and hill-climbing performance immediately after the conversion. This improvement comes primarily from the significant reduction in vehicle weight and the stable voltage output delivered by LiFePO₄ batteries throughout the discharge cycle.
If you are changing the system voltage—for example, converting from 36V to 48V—the motor controller, solenoid, charger, and other electrical components must also be upgraded accordingly.
Can I use my old golf cart charger on a new lithium battery?
No.
Traditional lead-acid chargers often include equalization or desulfation charging modes that apply high-voltage pulses designed to restore lead-acid battery performance.
These charging profiles are incompatible with lithium batteries and can permanently damage the battery’s internal Battery Management System (BMS).
Always install a charger specifically designed for LiFePO₄ batteries that matches your battery voltage and charging specifications.
Upgrade with Confidence
A successful golf cart lithium conversion is more than simply replacing batteries—it involves installing the correct charging system, ensuring proper electrical compatibility, and taking advantage of the intelligent features built into modern LiFePO₄ batteries.
When completed correctly, upgrading to lithium delivers immediate improvements in acceleration, driving range, charging speed, and reliability while virtually eliminating routine battery maintenance. For commercial fleets, the reduction in downtime and maintenance labor can significantly lower total cost of ownership over the vehicle’s lifetime.
Whether you’re upgrading a single personal golf cart or modernizing an entire fleet, following the correct installation procedures will ensure safe operation and long-term performance.
Ready to upgrade your golf cart? Contact our battery specialists to find the right drop-in lithium solution, charger, and conversion kit for your vehicle and application.