Changing a Motorcycle Battery: A Professional Guide for Repair Shops and Dealers
Changing a Motorcycle Battery: A Professional Guide for Repair Shops and Dealers
Changing a motorcycle battery is easy to underestimate. For a repair shop, the job is not complete when the engine cranks. Correct service means confirming the cause of failure, matching the battery to the exact application, preventing short circuits and electronic damage, installing every cable and restraint to specification, validating the charging system, and documenting the handoff. The workflow below applies broadly, but the motorcycle service information and battery manufacturer’s instructions always control.
|
Quick answer Turn the ignition off and follow the model-specific isolation procedure. Confirm the replacement battery’s fitment and readiness, then disconnect the old battery negative first and positive second. Install and secure the new battery, connect positive first and negative last, torque the hardware to specification, complete any required reset or relearn, and test both starting performance and the charging system. |
Before You Replace the Battery
Confirm that the battery—not an open circuit, loose cable, parasitic draw, starter problem, stator, or regulator-rectifier fault—is the real cause. A resting-voltage reading is useful for estimating state of charge, but it does not prove starting capacity. When the case is physically serviceable, charge and test the battery according to its manufacturer before condemning it. If discharge returns, investigate the motorcycle instead of repeatedly installing batteries.
Build the replacement order from the VIN, year, make, model, engine, and verified application guide. Compare nominal voltage, case dimensions, terminal orientation and hardware, hold-down method, positive-terminal cover, vent location, cranking rating and its test basis, amp-hour rating, and battery chemistry. A battery that fits the tray or carries a higher headline rating is not automatically compatible.
How to Change a Motorcycle Battery: Professional Workflow
- Open the repair order. Record the customer’s symptoms, odometer, battery part and date codes, accessories, prior charging history, and relevant diagnostic trouble codes. Check the OEM procedure for security disarm, key position, main-fuse removal, saved settings, or post-power-loss relearns. Use auxiliary memory support only when the OEM procedure approves it.
- Make the work area safe. Stabilize the motorcycle, remove the key, and keep sparks, flames, cigarettes, and fuel vapor away. Wear appropriate eye and hand protection, remove conductive jewelry, and use insulated or guarded tools. Isolate a cracked, leaking, swollen, frozen, or abnormally hot battery rather than testing or charging it normally.
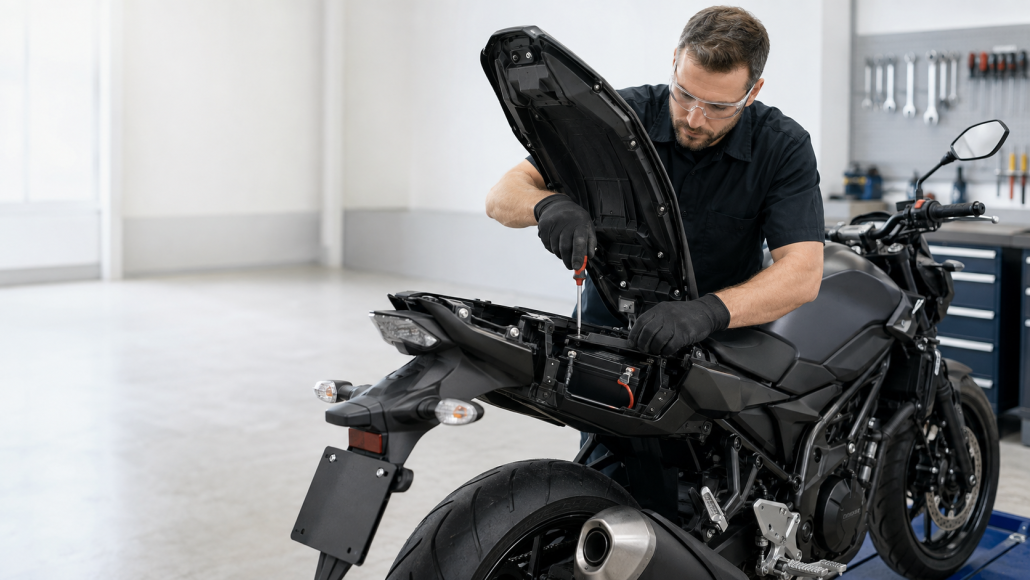
- Access and inspect. Remove the seat, side cover, fairing, or retention parts exactly as the service information specifies. Photograph unusual cable or accessory routing. Inspect the tray, pads, strap, terminals, ground point, cables, positive cover, and vent hose for corrosion, heat damage, looseness, abrasion, or incorrect previous work.
- Disconnect and remove. Unless the OEM procedure says otherwise, disconnect the negative cable first and the positive cable second. Protect the loose cable ends from accidental contact. Remove the hold-down and lift the battery without straining wiring; keep a conventional flooded battery upright and control any vent tube.
- Prepare the replacement. Verify the part and polarity again before it enters the tray. Inspect its state of charge and follow the product’s commissioning instructions. A factory-activated battery may still require testing or charging after storage. A fresh-pack AGM or conventional battery requires its exact electrolyte, stand, seal, and initial-charge procedure. Never open a sealed battery.
- Install and restrain. Position the battery with the specified pads or spacers, route cables without pinching or side-loading them, reconnect the approved vent hose when present, and reinstall the hold-down to the model’s torque. Confirm that no terminal can contact the frame, seat pan, tools, or cargo and that the positive protective cover will fully close.
- Reconnect correctly. Attach the positive cable first and the negative cable last, using the correct terminal hardware and cable stack order. Tighten terminal fasteners to the specified torque; loose connections create resistance and heat, while overtightening can damage small battery terminals. Apply protectant only as the manufacturer or OEM directs.
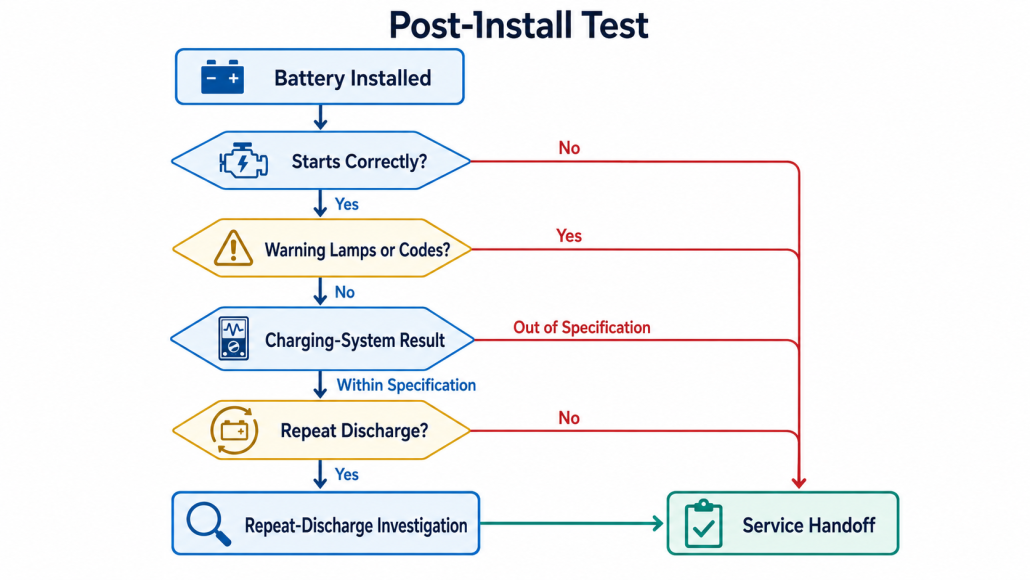
- Validate and document. Reinstall the main fuse and complete required clock, security, diagnostic, idle, throttle, or other model-specific procedures. Check cranking and warning indicators, then perform the OEM charging-system test at the specified conditions. Record the battery test, charging-system result, part and serial information, installation date, warranty data, and disposition of the old battery.
Battery-Specific Preparation Controls
| Battery status | Technician action |
| Factory-activated AGM / VRLA | Inspect, test, and charge if the manufacturer requires it after storage. Do not remove sealing caps or add electrolyte. |
| Bottle-supplied AGM or conventional | Activate only with the dedicated electrolyte and exact PPE, ventilation, stand, sealing, and initial-charge procedure. |
| Gel | Use only when the application and charging profile approve gel construction; do not assume AGM settings or replacements are interchangeable. |
| LiFePO4 starting battery | Confirm motorcycle-starting use, BMS capability, fitment, cranking output, vehicle charging-system compatibility, charger profile, and temperature limits. |
A First Start Is Not the Acceptance Test
A successful start proves only that the system worked once. Before delivery, verify terminal security, cable clearance, hold-down integrity, seat or panel fit, warning lamps, retained codes, and charging-system performance under the model’s specified conditions. If the original complaint involved repeat discharge, inspect parasitic draw and accessory wiring. A printed or saved pre/post test record turns a parts swap into a defensible service result.
The customer handoff should explain the installed chemistry, warranty requirements, compatible charger or maintainer, storage guidance, and any unresolved electrical issue. Return lead-acid and lithium batteries through approved, chemistry-appropriate channels and follow applicable facility, transport, and local rules.
Common Questions from Shops and Dealers
Can a lead-acid motorcycle battery be replaced with lithium?
Sometimes, but not by dimensions and nominal voltage alone. Use a LiFePO4 motorcycle starting battery approved for the application, and verify its cranking output, capacity, BMS, terminal layout, charging-system limits, charger requirements, temperature range, and warranty conditions. If those checks are not documented, retain the approved original chemistry.
Does every motorcycle need battery registration after replacement?
No. Registration, reset, or relearn requirements are model-specific, not a universal feature of modern motorcycles. Check current OEM service information before disconnecting power and again before closing the repair order.
How long should a professional battery change take?
Access and testing determine labor more than terminal removal. A simple under-seat installation can be quick, while fairing removal, security procedures, corrosion repair, accessory wiring, diagnostics, charging-system faults, or post-power-loss relearns add time. Quote labor from the model procedure and required acceptance tests rather than a universal number.
Final Advice
The best shops treat changing a motorcycle battery as a controlled electrical service, not a quick parts exchange. Diagnose first, match every fitment and electrical requirement, follow the safe terminal order, use model-specific torque and reset procedures, and prove the repair with battery and charging-system results. That process reduces comebacks, protects margins, and gives the customer a clear reason to trust the work.
Explore LEOCH 12V lithium motorcycle starting batteries, review the motorcycle battery wholesale guide, or contact the regional team for a catalog, verified cross-reference, or quotation.