How Do I Charge a Motorcycle Battery? A Safe Step-by-Step Guide
A weak motorcycle battery often shows up as slow cranking, clicking from the starter relay or a dashboard that dims during startup. Charging may restore it, but only when the charger matches the battery and the battery is still serviceable. The process is straightforward; the important part is avoiding shortcuts that can damage the battery, motorcycle electronics or you.
|
Quick answer To charge a motorcycle battery, identify its voltage and chemistry, then use a smart charger approved for that battery. With the charger unplugged, connect positive first and use the charger-specified negative point. Select the correct mode, let the automatic cycle finish, unplug the charger, and remove negative before positive. Never charge a cracked, swollen, leaking, frozen or abnormally hot battery. |
Before You Connect the Charger
Read the motorcycle owner’s manual, battery label or data sheet, and charger instructions. Confirm whether the battery is 6 V or 12 V and whether it is conventional flooded lead-acid, AGM, gel or LiFePO4 lithium. A generic “motorcycle” setting is not enough if the charge profile does not match the chemistry.
Park on a stable surface with the ignition off. Work in a dry, ventilated area away from fuel vapor, flames, cigarettes and sparks. Wear eye protection and gloves. Inspect the case and terminals before charging. Do not attempt to charge a battery that is cracked, leaking, visibly swollen, frozen or unusually hot; isolate it and follow the manufacturer’s replacement and recycling instructions.
How to Charge a Motorcycle Battery Step by Step
- Access the battery and confirm the instructions. Remove the seat or panel only as the motorcycle manual specifies. Decide whether the battery may be charged in the bike or must be removed. If removing it, disconnect the motorcycle’s negative cable first, then the positive cable.
- Keep the charger de-energized. Switch it off and unplug it from AC power before attaching clamps or a quick-connect lead. This reduces the chance of a spark at the battery.
- Connect the leads correctly. Attach red to the positive terminal. Attach black to the negative terminal or approved chassis ground exactly as the charger and motorcycle instructions direct. If the battery is removed from the bike, the charger normally connects directly to both battery terminals.
- Select the correct voltage and chemistry mode. Use the battery maker’s specified profile and a charge current within its limit. For LiFePO4, use a lithium-approved mode and avoid any automatic repair, recovery or desulfation program that cannot be turned off.
- Start the charge and observe the first few minutes. A smart charger should indicate the selected mode and charging status. Stop if the case becomes abnormally hot, swells, leaks, gives off an unusual odor or the charger repeatedly reports a fault.
- Let the automatic cycle finish. Do not stop simply because a fixed number of hours has passed. When the charger indicates completion or maintenance mode, switch it off and unplug it before touching the leads.
- Disconnect and reinstall safely. Remove the negative charger lead first, then the positive. If the battery was removed, reinstall it with the motorcycle’s positive cable first and negative cable last, using the specified hardware and torque.
Choose the Charger by Battery Type
| Battery type | Use | Key caution |
| Conventional flooded | Approved 6 V or 12 V lead-acid profile and current | Ventilation is essential. Service electrolyte only if the battery manual permits it; never open a sealed battery. |
| AGM | Battery-specified AGM or lead-acid smart profile | Avoid excessive voltage and heat. “Maintenance-free” does not mean the battery never needs charging. |
| Gel | Gel-approved profile | Gel designs can be sensitive to overvoltage; do not assume an AGM setting is interchangeable. |
| LiFePO4 lithium | LiFePO4-approved charger or mode | Do not use unselectable lead-acid repair/desulfation modes. Do not charge below freezing unless the battery maker expressly allows it. |
How Long Does a Motorcycle Battery Take to Charge?
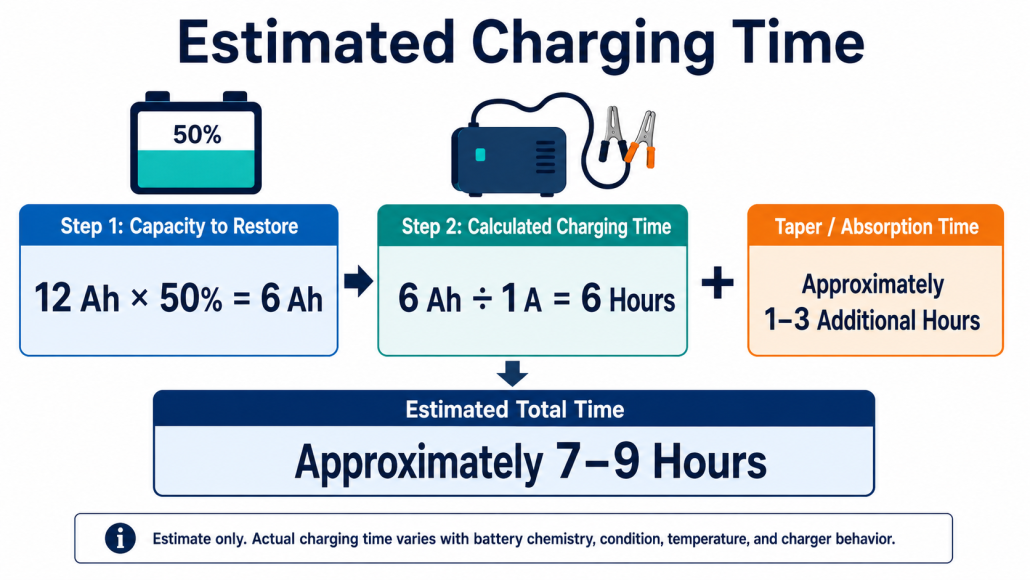
There is no universal answer. Charging time depends on the amp-hours that must be replaced, charger output, taper stage, temperature and battery condition. A useful base estimate is amp-hours to replace divided by charger current. For example, a 12 Ah battery that is roughly half discharged is missing about 6 Ah; a 1 A charger needs at least six hours before allowing for tapering and losses. Use this only as a planning estimate—the battery and charger instructions and the charger’s completion indicator control the real process.
Can You Charge the Battery Without Removing It?
Often, yes. In-bike charging is appropriate when the motorcycle, battery and charger manuals allow it, the ignition is off, the approved connection points are accessible and the area is ventilated. A fused quick-connect harness can make maintenance easier if it is installed and routed correctly. Remove the battery when the manual requires it, access is unsafe, the battery needs service, or you need to inspect it more closely.
Common Charging Mistakes
Do not choose a charger only because it is labeled for cars or motorcycles. Its voltage, chemistry profile and output must all suit the battery. Do not leave a manual charger unattended or connected after the required time. Most importantly, never use force or recovery mode on a deeply discharged battery unless the battery and charger manufacturers explicitly provide that procedure; a low-voltage lithium battery may have a protective BMS state that needs model-specific handling.
What If the Battery Still Will Not Hold a Charge?
Resting voltage can indicate approximate state of charge, but it does not prove starting capacity. After charging, follow the specified rest interval and use an appropriate load or conductance test. If the battery becomes discharged again, inspect cable connections and test for parasitic draw and motorcycle charging-system faults. A battery that fails the proper test, will not accept charge, repeatedly overheats or shows physical damage should be replaced rather than repeatedly recharged.
Should You Leave a Motorcycle Battery on a Maintainer?
A compatible automatic maintainer can help during seasonal storage or infrequent riding, but only if both the battery and charger are approved for continuous maintenance. Do not treat a basic trickle charger as a maintainer. Check the battery and charger periodically, keep the area dry and ventilated, and follow the battery manufacturer’s storage-temperature guidance.
Final Advice
The safest answer to “How do I charge a motorcycle battery?” is to match the charger to the exact battery, connect it while de-energized, let the approved automatic profile control the cycle and stop when the battery shows a warning sign. If charging problems return, diagnose the battery and the motorcycle’s electrical system before buying parts. When replacement is necessary, match fitment, terminals, voltage, cranking rating, capacity and chemistry—not voltage alone.
Explore LEOCH motorcycle and powersports battery options, or contact the regional team for a product catalog, cross-reference support or a quotation.